Testing your car’s AC compressor using a multimeter will help all drivers diagnose any potential issues with their vehicles. This enables you to extend the vehicle’s lifespan overall. Use our guide below to accurately test your car’s AC compressor.
How To Test A Car AC Compressor
Before taking on this task, there are a few pieces of equipment you’ll need. First, ensure you have a multimeter on hand for this process. This tool is used to measure various electrical properties like current, voltage, and resistance. Safety goggles and gloves are necessary to protect your eyes and hands when working with electrical components.
Next, use these five steps outlined below to test your car’s AC compressor using a multimeter.
Step 1. Safety First
- Safety should always be your first priority when it comes to working with a vehicle.
- Start by turning the engine off and letting it cool for a bit.
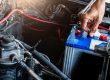
- Disconnect the battery as this can prevent any accidental electrical shocks.
- Find your car battery and disconnect the negative terminal first, followed by the positive.
- Utilize insulated tools in order to prevent any accidental short circuits.
- Ensure your goggles and gloves are on at this time.
- Always perform this DIY task in a well-ventilated space, such as a garage with open doors.
- You do not want to be exposed to harmful fumes coming from your vehicle.
Step 2. Find The AC Compressor
- Check your owner’s manual as this will have a diagram showing the exact location of the compressor.
- Look near the front of the engine to find the compressor.
- It is typically driven by the engine’s serpentine belt, often found in the front of the engine compartment.
- The compressor will appear like a small motor with a pulley.
- There are two hoses connected to the compressor – one for high pressure and one for low pressure.
Step 3. Set Up Your Multimeter
- Set up the multimeter by turning it to the ohms setting.
- This setting allows you to measure resistance, which is what you are checking in the compressor.
- Consult the multimeter’s manual for instructions on calibration in order to ensure accuracy.
- If needed, use alligator clips.
- These clips can secure the probes to the compressor’s terminals, which frees your hands to ensure a stable connection.
Step 4. Access The AC Compressor’s Terminals
- You must connect the multimeter to the AC compressor’s terminals at this time.
- Generally, the terminals are found on the side of your compressor.
- Remove any obstructions like shields, covers, or other components.
- Make sure to keep track of any parts or screws that you remove during the process.
- Refrain from using excessive force that could ultimately damage the compressor or other nearby components.
Step 5. Test The Car’s AC Compressor
- Connect the multimeter’s probes, as one probe goes to one terminal and the other probe goes to the second terminal.
- Ensure a stable connection at all times.
- Observe the resistance reading on the multimeter’s display.
- Check your vehicle’s manual for the expected resistance range.
- The compressor may be faulty if the reading is outside the expected range.
- Once the test has been completed, reattach the removed parts in reverse order.
- This ensures everything is back in its original, proper place.
Live In The Scottsdale Area? Get Your Inspection Done At Bridwell Automotive Center!
Get your road trip inspection and preparation service done at Bridwell Automotive Center, located at 7171 E Lincoln Dr. Scottsdale, Arizona 85253 or call (480) 948-4781 for more information.